Changing View Options
Most views you work with will be the same as your colleagues’. However, modifying a view slightly may offer a better perspective for your specific needs or improve clarity in reports.
Instead of creating a new view, you can customize the existing one. A new view is only necessary when you’re supporting a distinct or new task.
Steps to Modify a View
- Open the view you want to change.
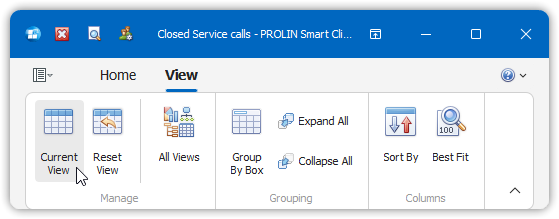
- Go to the View tab.
- Click Current View in the ribbon.
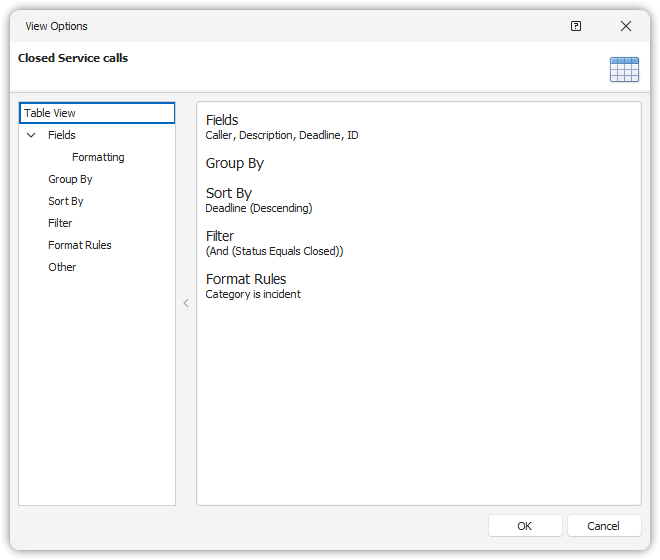
- The View Options dialog will appear.
- Make adjustments as needed in the dialog.
Some common modifications can also be accessed directly from the ribbon.
Fields
For Table Views
- Open the Fields screen in the View Options dialog.
- The dialog shows:
- A list of available fields.
- A list of selected fields currently displayed.
- To add a field:
- Select it from the available list and click Add or double-click the field name.
- To add fields from related items:
- Select the related item from the Show available field for dropdown.
- To apply display formatting:
- Open the formatting screen, select a field, and define the format.
For Chart Views
- Select fields for:
- X-Axis
- Y-Axis
- Series
- Note: Not all chart types support all three field roles.
Filters
Views can include a filter to show only a subset of data (e.g., only Service Calls assigned to you).
To edit or create complex filters, see Editing Filters.
Format Rules
Format rules highlight specific items in a view to draw your attention (e.g., Service Calls past deadline in red).
Creating a Format Rule
- In the View Options dialog, open the Format Rules screen.
- Click Add and assign a name.
- Under Rule Properties:
- Select formatting options (e.g., red font).
- The Sample field shows a preview.
- Under Condition:
- Define criteria for the rule (similar to filters).
- Resize the dialog if needed.
- Click the checkmark button to save.